Friday, February 28, 2014

Children's Journals

Hi everyone! Well, the month of February is on it's way out and March is on it's way in. I hope lovely green trees and beautiful flowers are on the way soon. Don't you?

My post tonight is on the cute journals I created for my grandchildren. They are always drawing and writing, so I thought they would enjoy having their very own journal, created especially for them. They absolutely loved them! It made my heart glad!
The journals are made from those black and white marble notebooks that a lot of the kids have to use in school. I used misc. stickers and scraps of designer paper.

I just had to share how cute they turned out. Thanks for the visit! Hugs Brenda

Tuesday, February 25, 2014

Happy Hello........Simple but Sweet Card

Hi everyone! I hope you enjoyed the tutorial Mini Book by Susan Cucumber, I posted a couple of days ago. I don't have the web page, but if you google it, that's how I found it. I thought it would be good to put on a scrapbook page to put extra photos or journaling. What do you think?

It's been so pretty the last couple of days, that I've been in the mood to work out in the shop. I noticed I was low on get well, sympathy, birthday or just happy hello cards, so I've been working to get stocked up. This card I'm posting today is just a simple but a sweet and happy hello card.

This is such a cute and simple card, you can create several of these in a snap. Those of you may remember I love buttons and I have tons of all colors, so I'm trying to use up some of my stash.

On this card, I'm letting the embossing folder do most of the work.

I used this small happy hello from Stampin-Up. I used yarn and a small flower punch to give just a little extra embellishment.

Thank you for stopping by. Hugs Brenda

Friday, February 21, 2014

A Mini Book.................By Suzy Cucumber.

Pattern from Making Books and Journals, designed by Paula Beardell Krieg.

To make one of these little cuties, you'll need:
○ Paint chips (I taped two together to get 9½ in. for the length.)
○ Embossing tool & pattern folder
○ Wide paper packing tape (which I wish I had used instead of clear packing tape)
○ Craft Glue
○ Scissors
○ Ruler
○ Craft Knife

For one signature, you'll need:
○ White paper, six pieces cut 2 by 4¾ in.
○ About 10 in. of twine, ribbon, or silky cord

1. Tape the paint chips together lengthwise using the paper packing tape. I used clear packing tape, and it took more glue, weight, and time to stick together. You'll cut the taped paint chips to 2 by 9½ in. for the book cover.

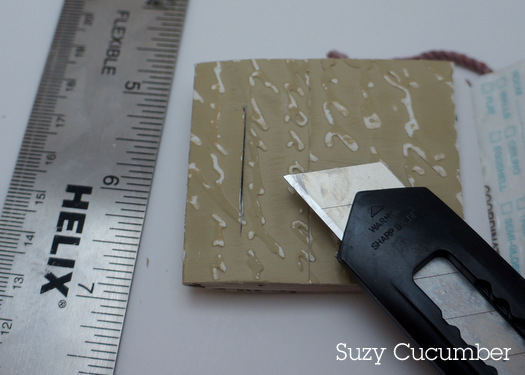
2. I embossed my paint chip cover using an embossing tool and script pattern to give it texture. I also gave the embossed paint chip a quick sand with sandpaper to reveal the white backing, which really brought out the pattern.


3. Score the cover according to the diagram below.

4. Score and fold the top corners in on the diagonal to create a point and glue the flaps to the inside of the cover. Then fold up the bottom section at the score line and glue the two 2¼–in. sections together.

5. You'll make the signature next. Cut a piece of typing paper into six pieces, 2 by 4¾ in. each. Fold each piece in half separately and then nest them together.

6. Match the folded signature to the top fold under the point made in Step 4. Close the cover and snip the top corners off the cover and signature fold, which will keep the cord in place. Open the cover and wrap the 10–in. piece of cord from the center of the signature fold to the outside of the cover. Give it a knot, and tie knots in the ends of the cord.

7. Close the top and bottom edges over the signature and cut a slit for the point in the bottom edge of the cover. To determine where to cut, leave about ⅝ in. on each side of the point. Use a craft knife and metal ruler. Don't cut into the signature below!


Now, write your book.


I'm going to write my favorite quotes in my mini book.


Jelly bean books are a satisfying little project. Better than a handful of real jelly beans.

Friday, February 14, 2014

Happy Valentine's Day!

Happy Valentine's Day everyone! I hope you all are treating your sweeties right? Today is a day when we can have candy and not feel guilty, right?

I made my husband a handmade card, of course! I created it using the Stampin-up bear again. I made a whole sheet of these, so that's why you are seeing a lot of him this month. I also created these cute little boxes to put candy in. These are very simple to make. Maybe I'll share a tutorial on these boxes soon.


I hope you all are having a Love filled day! Thank you for stopping by today. Hugs to all! Brenda

Wednesday, February 12, 2014

Birthday Wishes!

Hello and Happy Wednesday, to everyone! I hope you all are staying warm and dry. This has been some kind of weather, here in Georgia. We've had everything from snow flurries, sleet, to freezing rain. I don't know about you all, but I'm ready for Spring. Who's with me?

Today I would like to share the Birthday card I made for my grand-son. I'm always making cards that are great for women or girls, but I seem to have a problem when it comes to boys or guys. I need to find a masculine flare to some of my cards. Maybe in the near upcoming future, I'll have a challenge for masculine cards. Stay tuned for more details.

Happy Birthday, Riley! Nonnie loves you!
I used the same Stampin-up bear as the last post. I used a paisley designer paper background onto a basic 5 1/2 X 4 1/4 white card base, added a blue gingham ribbon tied into a loose knot instead of a bow.
I'm giving him money, so instead of putting it in the card, I made this pillow box made out of a toilet paper roll. I also covered this with the same designer paper.
As always, thank you for stopping by today! Hugs to all, Brenda

Tuesday, February 4, 2014

Anniversary / Valentine Card

Hi everyone! Well, we're well on our way through February and what a great month for love. Yesterday was my daughter (Jess ) and son-in-law's ( Chris ) 8th anniversary. Jess wasn't feeling well yesterday and left from work early, so I thought I would help out on their special day. I picked up pizza ( Jess's favorite food ) and Red Velvet Cake cookies ( Chris loves red velvet cake ) and took it over to their house. I had made a handmade Anniversary card for them, the day before. For those of you that know me, you know I love buttons. I have so many buttons and I need to start doing something with them, instead of hoarding them. LOL! Much love went into this card, not just because I love my daughter and son-in-law, but because I love my buttons. This card can also be used as a Valentine card.
The teddy bear on the front of this card is an old Stampin Up rubber stamp.
The eyes for the bear are from Spellbinders Want 2 Scrap Nestabling. The cute little buttons that I used are from Itsy Bitsy Buttons.
The bow was made using Craft-Dee Bowz bow making tool.

As always, thank you so much for stopping by. Hugs Brenda

Saturday, February 1, 2014

Valentine Mailbox

Well, it's the first day of February and I'm ready for Valentine's Day! On a couple of those cold days we had, I brought some things in from the garage to work on. I searched some websites for a pattern of a mailbox, but I didn't find one that I liked, so I made my own pattern. With a few trial and errors, this is what I came up with.


It's empty right now, but I'm hoping it will be filled soon.

I have a few more things I'm working on, so come back soon! Thank you for stopping by! Hugs Brenda