Hi everyone ! I just wanted to take a few minutes and wish you all a Happy, Healthy, Prosperous and Safe New Year!
I am not at home, so I'm posting from a family member's computer. I will not be posting for a few days, but have no fear! I'll be back!
Thank you all for being so faithful and stopping by. Hugs to all! Brenda
Monday, December 31, 2012
Monday, December 24, 2012
It's Christmas Eve!
Are you all looking for Santa? I know a couple of little ones that are so excited, I don't know if they will get any sleep tonight?
I'm at my daughter's house in North Carolina for Christmas this year. Last year I spent it in Georgia with my oldest daughter, her husband, her In-Laws and my two precious grandchildren, Riley and Braelynn. I will miss their excitement, but I'm enjoying Christmas here. I'm sure I'll hear and see all about what Santa brought them!
I know I didn't fill every day of December like I wanted to, I don't know what I was thinking? Oh! That's right! I wasn't thinking! LOL! I don't know why I thought I could get everything done that I needed to do, before leaving for the trip and do something for my blog every day in December. Well, anyway! I do have some things to share with you that I have done since I last posted.
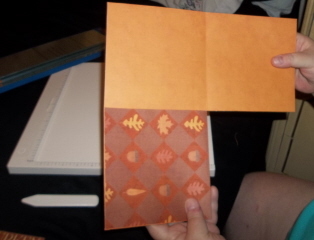
 This is the Christmas card I made to give out to the Doctors, Nurses, Technicians and patients where I have been taking radiation treatments for breast cancer. Now with saying that, I didn't mention that to get sympathy, I only want to let you all know that I am very thankful it was detected early and was very small. I didn't have to take Chemo. I give God all praise! He is so good! All the time! Sorry the picture isn't turned right, I don't know that much about my daughter's computer.
 This is what it said on the inside.
 I made these boxes and paperclip angels to give to the Doctors and staff too!
 My sister and I were diagnosed a month apart with breast cancer, so I made her this fleece blanket for Christmas. She has been taking chemo and she has to take radiation afterwards, so I think she'll like this to carry with her to treatments.
 This is it all wrapped up!
Wishing you Joy, Peace and Happiness with your family and friends tonight. Most of all let's remember the true Reason for the Season, " Jesus "! Happy Birthday Jesus!
Thank you for stopping by! Love and Hugs to all! Brenda
I'm at my daughter's house in North Carolina for Christmas this year. Last year I spent it in Georgia with my oldest daughter, her husband, her In-Laws and my two precious grandchildren, Riley and Braelynn. I will miss their excitement, but I'm enjoying Christmas here. I'm sure I'll hear and see all about what Santa brought them!
I know I didn't fill every day of December like I wanted to, I don't know what I was thinking? Oh! That's right! I wasn't thinking! LOL! I don't know why I thought I could get everything done that I needed to do, before leaving for the trip and do something for my blog every day in December. Well, anyway! I do have some things to share with you that I have done since I last posted.


Wishing you Joy, Peace and Happiness with your family and friends tonight. Most of all let's remember the true Reason for the Season, " Jesus "! Happy Birthday Jesus!
Thank you for stopping by! Love and Hugs to all! Brenda
Tuesday, December 11, 2012
On the Ninth, Tenth and Eleventh day of December..............
Well, I thought I would give you all a break and not post for a couple of days. Here are the items I created. I created a gift box and two different Christmas cards.

Enjoy the rest of your week and thanks for stopping by. Hugs Brenda
Enjoy the rest of your week and thanks for stopping by. Hugs Brenda
Saturday, December 8, 2012
On the Eight day of December...............
I created a Holiday Cheer card. This could work for a Christmas card or a New Year's card.

I love all the glitz on this card, don't you? Thanks for stopping by again! Hugs to all, Brenda
I love all the glitz on this card, don't you? Thanks for stopping by again! Hugs to all, Brenda
Friday, December 7, 2012
On the Seventh day of December...............
I certainly got out of my box on this one! LOL! This is not your traditional snowflake card, but I love the way it turned out!
 Thanks for stopping by again. Come back tomorrow and see what I come up with. As always I enjoy your visits and input. Hugs Brenda
Thursday, December 6, 2012
On the Sixth day of December...............

I hope your week is going well and everyone is looking forward to the weekend. I know I am! I'll be back tomorrow with another creation. Hugs Brenda
Wednesday, December 5, 2012
On the Fifth day of December...............

I know this is short and sweet, but I'm still not feeling quite up to par. I think I'm going to turn in early. Good night everyone. See you tomorrow, Good Lord willing. Hugs Brenda
Tuesday, December 4, 2012
On the Fourth day of December.................
I created a heart full of snowflakes card. This handmade Christmas card is just a little different than usual, but then again, that's what I'm trying to do. The unusual! I'm gradually trying to get out of my box! LOL!

I wish you all a good night and sweet dreams. Hugs Brenda
I wish you all a good night and sweet dreams. Hugs Brenda
Monday, December 3, 2012
On the Third day of December................
Hello again! You'll see me post quite a bit in December, since I have given myself a challenge. I will be creating something everyday and posting it on my blog. Here are the items that I started with!
1.) red and white baker's twine
2.) berry garland
3.) 4 1/2 in. paper doilies
4.) glue

This is what I came up with, A peppermint angel! I absolutely love it!
Thanks for stopping by. Don't forget to check back tomorrow! Hugs Brenda

1.) red and white baker's twine
2.) berry garland
3.) 4 1/2 in. paper doilies
4.) glue
This is what I came up with, A peppermint angel! I absolutely love it!
Thanks for stopping by. Don't forget to check back tomorrow! Hugs Brenda
Sunday, December 2, 2012
On the Second day of December..............
I created a set of boxed Christmas cards. I really had a lot of fun making these. This is going to be a nice little challenge for me, to create something everyday until Christmas. Don't forget to check back tomorrow to see what I've been up to. LOL! Hugs Brenda

Saturday, December 1, 2012
On the first day of December................I created a Santa card!
Since this is the first day of December, I have decided to post a new creation every day until Christmas. What do you think? Here's my first creation, so come back each day and see what other creations I come up with. See you tomorrow! Hugs Brenda

Friday, November 30, 2012
An Announcement....................Drum Roll Please!
I am so excited to tell you that Donna from Craft-Dee Bowz has asked, if I would like to be on her design team. Of course I said yes! I'm so excited but nervous too. She sounds like a pleasant person and I'm looking forward to working with her and all of the other Design Team Members. Thank you Donna, I hope I make you proud. I just had to share! Go check out her blog. I have uploaded some pictures from her blog, but she has so much more to look at. This wonderful tool allows you to make beautiful bows to adorn all of your beautiful creations!Hugs to all, Brenda

It goes where you go. The dowels store inside! Take it with you to stamp parties too!

Craft-Dee BowZ
It goes where you go. The dowels store inside! Take it with you to stamp parties too!
Wednesday, November 28, 2012
Work Shop Wednesday #4............Punch Around the Page
Today is work shop wednesday, so I'm posting something today that I think we all have had problems with at one time or another. I know I have!
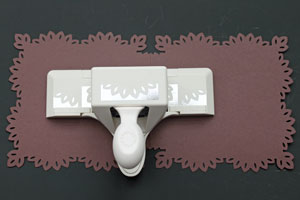
This is a tutorial on punch around the page. I found this tutorial on http://splitcoaststampers.com Check it out! I think it could be a big help to a lot of us.
Thank you for stopping by. Hugs, Brenda
Punch Around the Page
by Beate Johns
Create perfect borders and corners with Martha Stewart's new punch combo.
Supplies

- Martha Stewart Punch Around the Page, Topiary Edge & Corner Punch used here
- Cardstock, 5" x 10" piece of Chocolate Chip cardstock used here
- Stamps, Verve's Hearts on Fire and Kindred Spirits used here
- Ink, Additional Cardstock and Embellishments to finish the card
Step-by-Step
Step 1
Pull out the guide wings of the corner punch.
Slide one corner of the cardstock into the punch. Make sure both sides of the cardstock line up right against the sides of the guide.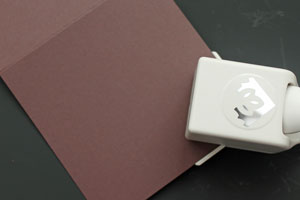
- Punch down.
Hint:
For seamless punching, you will need to start out with certain cardstock measurements. Those are 3 1/4", 5", 6 3/4", 8 1/2", 10 1/4" or 12".
Instructions are included in the packaging, but you can find them here, too!
Punch How-To (PDF, 315KB)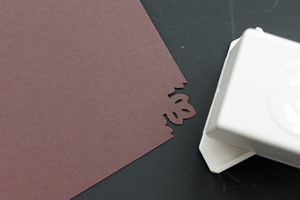
Step 2
Repeat on all four outer corners.
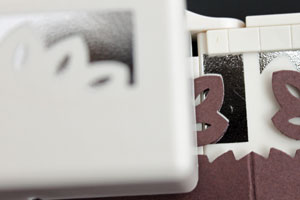
Step 3
Fold cardstock in half.
Fold one wing of the corner guides back into the punch.
Line up one of the inner corner edges with the corner punch.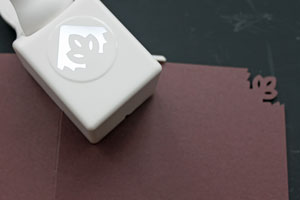
- Line up the mark on the side of the punch with the score line.
Step 4
Repeat on all four inner corners.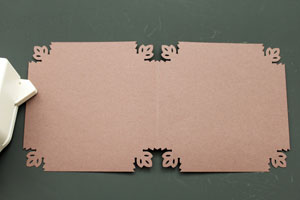
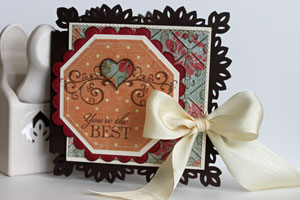
Step 5
Unfold the guide wings of the border punch and slide cardstock in.
- Line up one of the corners with the corner image on the border guide.
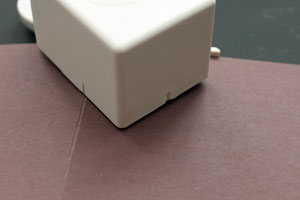
Step 6
Punch your first border image.
- Line up punched border with border on guide and punch again.
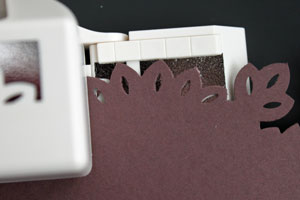
Step 7
Punch again.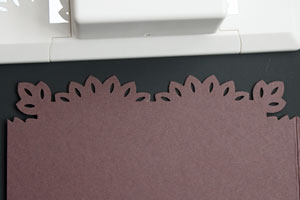
- Repeat on all borders.
Step 8
Fold card base in half.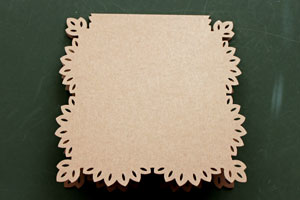
- Decorate card front.
Wednesday, November 21, 2012
Happy Thanksgiving!
Hi everyone! I want to take just a few minutes and thank you all for visiting my blog and becoming a follower of mine. You all are very special to me. My sole reason for starting this blog was to share what I love, and maybe to inspire someone in the process. For that, I am very thankful!
 I would like to wish you all a very Happy Thanksgiving! Hugs Brenda

Tuesday, November 13, 2012
Be Thankful............
Hello all my blogger friends! I hope your week is going good and you're getting ready for all of the festivities next week.
I am so thankful for all of my family, friends and all of you out there in blogger land.I know I don't know you personally, but I feel we have a common bond, our love of crafting.
I am posting the handmade Thanksgiving card that I am mailing out this week. This is another one of those simple but pretty cards that I came up with. I came across one similar on Pinterest and I tweaked it a bit.
Thank you for stopping by. I hope the rest of your week goes well. Hugs Brenda
Wednesday, November 7, 2012
November Calendar Page
Hi everyone! I just wanted to pop in real quick and share my Handmade Calendar Page for 2013.
I am a member of an online group called Perfect Friends and every year we have sign ups for a calendar page. This year I happen to pick November. I'm very pleased with the turn out.
Thank you for stopping by and allowing me to share this with you. Hugs Brenda

I am a member of an online group called Perfect Friends and every year we have sign ups for a calendar page. This year I happen to pick November. I'm very pleased with the turn out.
Thank you for stopping by and allowing me to share this with you. Hugs Brenda
Challenges Entered
1.) http://www.clearlyistamp.blogspot.com ...................Critters
2.) http://crazy4challenges.blogspot.com ............Anything But a Card
3.) http://twistedtuesdaychallenges.blogspot.com .............Masculine
4.) http://catchthebugblog.blogspot.com ...........Anything Goes
5.) http://raisethebarchallenge.blogspot.com ............Anything Goes
6.) http://jellyparkchallenges.blogspot.com ............Anything Goes
7.) http://cardcraftercircle.blogspot.com ............Pattered Paper
Sunday, November 4, 2012
Time has come..............
Hi, all my blogger friends! I hope your week has gone well and you are enjoying the weekend? It's that time of year when I have to set my clocks back an hour. I hate this time of year! It takes me forrrrr everrrrr to get use to this time change. I didn't have a problem getting up this morning because the sun was shinning in my eyes at 7:30, but I guarantee that when it gets dark at 5: 30, my body will be shutting down for the night. LOL! Yes, Fall is here! Fall is my favorite time of the year, I just don't like the time change.
Okay, I'm off my soap box now! I do have a couple of Handmade Thank You Cards that I want to share with you. I got this idea off of Pinterest. These are very simple and I was able to get a few done in a hurry. I need to get them in the mail tomorrow.
I just wanted to share. I hope you like them and try to make a few for yourself? As always! Thanks for stopping by. Have a great week! Hugs Brenda
 Card Recipe
1.) white card stock for card base
2.) scrapbook paper layered onto card base
3.) white card stock stamped with random filigree stamps
4.) burnt sienna ink pad
5.) burnt orange ribbon
6.) brown copic marker for writing Thank you
Okay, I'm off my soap box now! I do have a couple of Handmade Thank You Cards that I want to share with you. I got this idea off of Pinterest. These are very simple and I was able to get a few done in a hurry. I need to get them in the mail tomorrow.
I just wanted to share. I hope you like them and try to make a few for yourself? As always! Thanks for stopping by. Have a great week! Hugs Brenda
1.) white card stock for card base
2.) scrapbook paper layered onto card base
3.) white card stock stamped with random filigree stamps
4.) burnt sienna ink pad
5.) burnt orange ribbon
6.) brown copic marker for writing Thank you
Saturday, October 20, 2012
Work Shop Wednesday # 3..................Flag Book
Hi everyone! I know it's not Wednesday, but I won't be home to post this tutorial for Work Shop Wednesday. This is a flag book tutorial that I found online. It's a great tutorial with beautiful instructions. What a great website! Check it out! Click on the Mini Album Tutorial and it will take you to the website. As always, thank you for stopping by. Hugs Brenda
MINI ALBUM TUTORIALS
MINI ALBUM TUTORIALS
Note that the pages (or flags) on this album are only 4 3/8" x 2 " which is quite small. You might be hard pressed to fit photos on each of the pages, see the hints below for some useful ideas for this size mini. I am going to use this book as an ABC album for my daughter. She will cut out pictures and paste them into the book.
Experiment with size
A 5"x8" book would be a great size for a photo mini album. With two layers of flags your pages will be around 5"x4" in size which would be great to work with. Experiment with the size of your mini albums and find something to suit your needs.Materials
- 2 pieces of 4½" x 6¼" chipboard (front and back covers)
- 2 pieces of patterned paper 5½" x 7½" (to cover the front and back covers)
- 2 pieces of 4¼" coordinating papers (Inside of both covers)
- 1 strip of 6" x 6" (book spine)
- 15 pieces of 4 3/8" x 2 " card stock (the flags or pages)
- 1 piece of 26" ribbon (closure)
- Paper trimmer, Adhesive (I used a glue stick and double sided tape)
Step by Step Directions
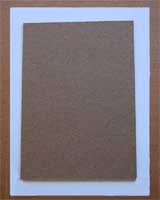
Prepare the covers
Take One of the chipboard covers and one of the 5½" x 7½" patterned papers. Adhere the chipboard cover to the center of the patterned paper with a glue stick. |

Step twoMiter the corners of the scrapbook paper with a craft knife. |
Score along the fold lines of the side flaps with a bone folder or simply use your finger nail. Then adhere the flaps down with a glues stick. |
 Step one
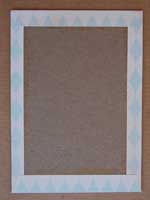
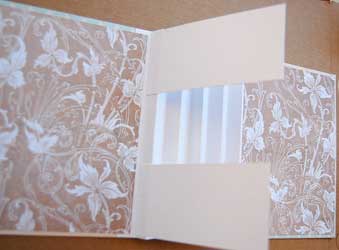
 Step three
Making the spine of the book
Take the strip of 6"x"6" card stock and score a vertical fold line every ½" along the length. |
Adhere the spine to the front cover as pictured here. |
Take one of the 5½" x 7½" coordinating paper pieces and adhere it to the inside cover. |
Repeat steps five and six to adhere the back cover to the book spine. |
 Step four
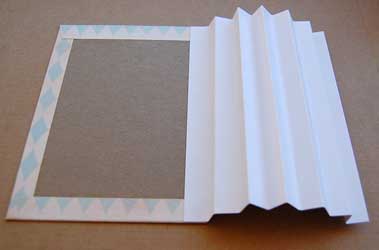 Step five
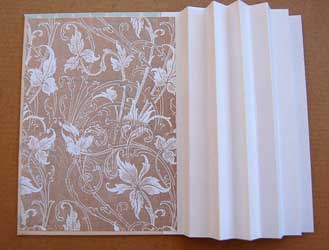 Step six
 Step seven
Attaching the Flag Pages
Stick your pages to the spine. The pages on the top and the bottom will be attached to the left sides of each accordion fold
Note. I used double sided tape to adhere the flags, it was a bit tidier than glue. |
The middle pages will be attached to the right side of each accordion fold. |
Attach all the pages or flags until you have used all 15. There should be 5 flags on each row. |
 Step eight
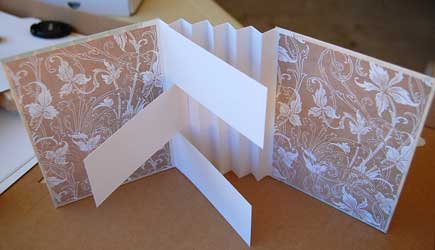 Step nine
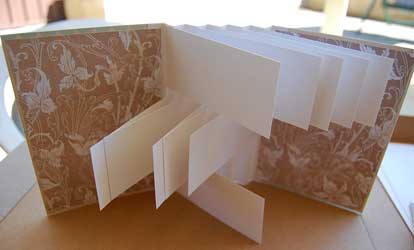 Step ten
Happy Halloween!
Hello everyone! I hope you all have had a good week? I love this weather we are having here, just outside of Savannah Ga. The Fall brisk air is delightful, the windows are up and it feels wonderful!
I've been playing a little and having fun making Halloween cards.
Here is the latest handmade Halloween card I've been working on. . I don't know if I'll have the time to enter it into any challenges, but that's okay.

Well this is short and sweet, I hope you like the card and make some of your own. I do enjoy sharing with you all and I am so thankful for everyone stopping by. Come again soon! Hugs Brenda
Wednesday, September 26, 2012
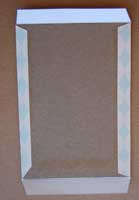
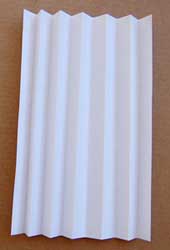
Work Shop Wednesday # 2.....................Scrapbook Page/Booklet

Tools you will need:
scoring tool
bone folder
paper trimmer
scissors

2.) cut up to the center of one of those score lines.
fold as shown below. There you have a booklet.


4.)After embellishing your page, fold back into booklet form.
5.) Make sure you decorate and embellish the front cover, because that is your presentation.
This scrapbook page/booklet has a lot of potential. You are only limited to your imagination.

Well as always, thank you for stopping by. I hope you enjoyed this project. Let me know what you think and if you tried making one. If you have any questions, please feel free to ask. Hugs to all! Brenda


Subscribe to:
Posts (Atom)