Friday, November 30, 2012

An Announcement....................Drum Roll Please!

I am so excited to tell you that Donna from Craft-Dee Bowz has asked, if I would like to be on her design team. Of course I said yes! I'm so excited but nervous too. She sounds like a pleasant person and I'm looking forward to working with her and all of the other Design Team Members. Thank you Donna, I hope I make you proud. I just had to share! Go check out her blog. I have uploaded some pictures from her blog, but she has so much more to look at. This wonderful tool allows you to make beautiful bows to adorn all of your beautiful creations!Hugs to all, Brenda


Craft-Dee BowZ

<b>Craft-Dee BowZ</b>
It goes where you go. The dowels store inside! Take it with you to stamp parties too!
 

Wednesday, November 28, 2012

Work Shop Wednesday #4............Punch Around the Page

Hi, everyone! I hope you all had a beautiful and blessed Thanksgiving? I had a nice quiet one. This is the first Thanksgiving in a long time, that we didn't have our children here. I missed them a lot, but I have to respect and understand that they have families of their own now and I'm okay with that.

Today is work shop wednesday, so I'm posting something today that I think we all have had problems with at one time or another. I know I have!

This is a tutorial on punch around the page. I found this tutorial on http://splitcoaststampers.com Check it out! I think it could be a big help to a lot of us.

Thank you for stopping by. Hugs, Brenda


Punch Around the Page

by Beate Johns
Create perfect borders and corners with Martha Stewart's new punch combo.

Supplies

Step-by-Step

  1. Step 1

    Pull out the guide wings of the corner punch.

    Slide one corner of the cardstock into the punch. Make sure both sides of the cardstock line up right against the sides of the guide.
  2. Punch down.

    Hint:
    For seamless punching, you will need to start out with certain cardstock measurements. Those are 3 1/4", 5", 6 3/4", 8 1/2", 10 1/4" or 12".

    Instructions are included in the packaging, but you can find them here, too!
    Punch How-To (PDF, 315KB)
  3. Step 2

    Repeat on all four outer corners.
  4. Step 3

    Fold cardstock in half.

    Fold one wing of the corner guides back into the punch.

    Line up one of the inner corner edges with the corner punch.
  5. Line up the mark on the side of the punch with the score line.
  6. Step 4

    Repeat on all four inner corners.
  7. Step 5

    Unfold the guide wings of the border punch and slide cardstock in.
  8. Line up one of the corners with the corner image on the border guide.
  9. Step 6

    Punch your first border image.
  10. Line up punched border with border on guide and punch again.
  11. Step 7

    Punch again.
  12. Repeat on all borders.
  13. Step 8

    Fold card base in half.
  14. Decorate card front.


Name:

Email: (your email address will not be shown)

Location: (optional)

URL: (optional)

Remember my personal information

Notify me of follow-up comments?


Wednesday, November 21, 2012

Happy Thanksgiving!

Hi everyone! I want to take just a few minutes and thank you all for visiting my blog and becoming a follower of mine. You all are very special to me. My sole reason for starting this blog was to share what I love, and maybe to inspire someone in the process. For that, I am very thankful!

I would like to wish you all a very Happy Thanksgiving! Hugs Brenda

Tuesday, November 13, 2012

Be Thankful............

Hello all my blogger friends! I hope your week is going good and you're getting ready for all of the festivities next week.

I am so thankful for all of my family, friends and all of you out there in blogger land.I know I don't know you personally, but I feel we have a common bond, our love of crafting.

I am posting the handmade Thanksgiving card that I am mailing out this week. This is another one of those simple but pretty cards that I came up with. I came across one similar on Pinterest and I tweaked it a bit.

Thank you for stopping by. I hope the rest of your week goes well. Hugs Brenda


Wednesday, November 7, 2012

November Calendar Page

Hi everyone! I just wanted to pop in real quick and share my Handmade Calendar Page for 2013.
I am a member of an online group called Perfect Friends and every year we have sign ups for a calendar page. This year I happen to pick November. I'm very pleased with the turn out.

Thank you for stopping by and allowing me to share this with you. Hugs Brenda


Challenges Entered
1.) http://www.clearlyistamp.blogspot.com  ...................Critters           
2.) http://crazy4challenges.blogspot.com ............Anything But a Card
3.) http://twistedtuesdaychallenges.blogspot.com .............Masculine 
4.) http://catchthebugblog.blogspot.com ...........Anything Goes           
5.) http://raisethebarchallenge.blogspot.com ............Anything Goes 
6.) http://jellyparkchallenges.blogspot.com ............Anything Goes   
7.) http://cardcraftercircle.blogspot.com ............Pattered Paper        

Sunday, November 4, 2012

Time has come..............

Hi, all my blogger friends! I hope your week has gone well and you are enjoying the weekend? It's that time of year when I have to set my clocks back an hour. I hate this time of year! It takes me forrrrr everrrrr to get use to this time change. I didn't have a problem getting up this morning because the sun was shinning in my eyes at 7:30, but I guarantee that when it gets dark at 5: 30, my body will be shutting down for the night. LOL! Yes, Fall is here! Fall is my favorite time of the year, I just don't like the time change.

Okay, I'm off my soap box now! I do have a couple of Handmade Thank You Cards that I want to share with you. I got this idea off of Pinterest. These are very simple and I was able to get a few done in a hurry. I need to get them in the mail tomorrow.

I just wanted to share. I hope you like them and try to make a few for yourself? As always! Thanks for stopping by. Have a great week! Hugs Brenda

Card Recipe
1.) white card stock for card base
2.) scrapbook paper layered onto card base
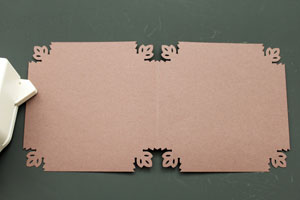
3.) white card stock stamped with random filigree stamps
4.) burnt sienna ink pad
5.) burnt orange ribbon
6.) brown copic marker for writing Thank you